

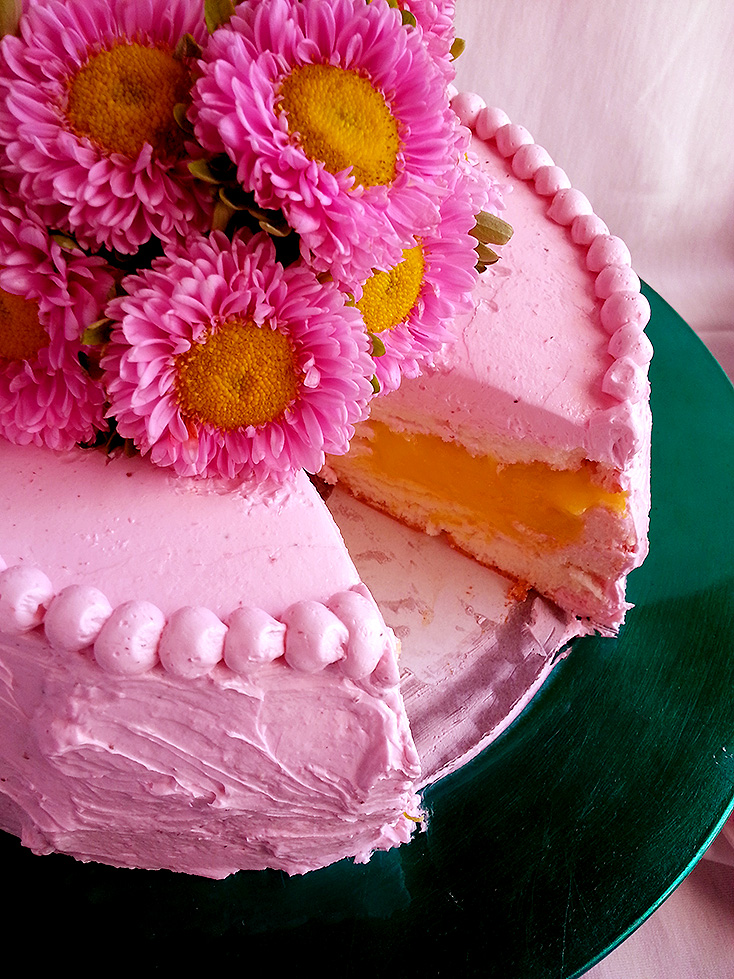
It’s Easter time again! Time for little bunnies and chocolate candy and the smell of vinegar mixing with dye tablets (we always made way too many colored Easter eggs when I was little!). It’s the perfect time of year for a bright, cheerful cake. After most of you have slogged through a winter packed with snow and ice, don’t you deserve a springtime-y cake filled with meyer lemon curd, covered with fresh strawberry frosting and topped with fresh flowers?
Yes, you most certainly do.
I decided to bring out my most favorite angel food cake recipe, the one that had all sorts of cute tiny deer and pine trees at Christmas. This time it gets a springtime makeover! I finally found a wonderful use for Meyer lemons, cause the lemon curd that fills this cake is chock full of them. Let’s dive right in, shall we?
spring flower cake with meyer lemon curd
+ strawberry frosting
(serves 10-12)
angel food cake:
(modified from The Joy of Baking)
1 1/4 c (125 g) cake flour
1 1/2 c (300 g) granulated sugar
12 egg whites, room temperature
1 tsp cream of tartar
1/2 tsp kosher salt
1 Tbs lemon juice
1 1/2 tsp vanilla extract
meyer lemon curd:
(modified from Lori Longbotham; yields about 3-4 cups)
1 c (2 sticks / 8 oz) unsalted butter
1 1/2 c (300 g) granulated sugar
1 c Meyer lemon juice (from about 10 small lemons)
4 Tbs Meyer lemon zest
1/8 tsp kosher salt
12 egg yolks
strawberry swiss buttercream:
(modified from Sweetapolita; yields about 4 cups)
5 egg whites (150 g), freshly cracked or pasteurized from a carton
1 1/4 (250 g) granulated sugar
1 1/2 c (2 1/2 sticks / 12 oz) unsalted butter, softened
1/2 tsp vanilla extract
pinch of kosher salt
1/2 c (116 g) sliced fresh or frozen (thawed) strawberries, packed tightly
pink food coloring, optional
To make the angel food cake: Preheat your oven to 350 degrees and have a clean, ungreased aluminum tube pan at the ready. Start out by making sure your egg whites are room temperature. I find that the easiest way to accomplish this is to soak the un-cracked eggs in a large bowl full of hot water for 10-15 minutes. When time’s up, pull out the eggs and (with clean, grease-free hands) separate the whites into a super clean and grease free bowl (ceramic, metal or glass is great; plastic bowls tend to hold on to grease).
Take 3/4 c of your 1 1/2 cups of sugar and sift it with your flour into a medium bowl. Set it aside and let’s get to whipping the egg whites! Pour your separated whites into the bowl of a stand mixer (also making sure the mixer and the whip attachment are spotlessly clean and grease-free) and whip them on speed 5 (if you’ve got a KitchenAid) for 1 minute. The whites should be foamy and bubbly but still runny. Add the cream of tartar, lemon juice and salt to the whites and beat it all on speed 5 for 2 minutes. At this point, the whites should be at the soft peak stage. They’ll have a little bit of volume and slightly mound up on themselves. Using a tablespoon measure, gradually add the remaining 3/4 cup of sugar to the egg whites. Turn the mixer on to speed 5, adding your 1 tablespoon of sugar at a time, waiting about 8 seconds between each addition. From start to finish, this process should take two minutes. Turn the mixer to speed 7-8 and whip for 4-5 minutes more. By this point, you should have a bowl of stiffly beaten but still shiny and glossy meringue! It’ll look a lot like shaving cream, and it shouldn’t look dry or clumpy. On speed 5, beat in your vanilla. You can whisk it by hand a little with the whip attachment to make sure that the extract is totally incorporated.


From here, it’s easier to transfer the egg whites to a large, clean bowl to fold in the flour/sugar. Using a 1/4 cup measure, sift the flour/sugar on top of the meringue using a sifter or a fine mesh strainer. With a rubber spatula, carefully fold the flour/sugar into the meringue. Repeat with 1/4 cup at a time of your remaining flour/sugar until it’s all incorporated. This process took me about 7 separate additions.


Using your spatula, carefully scoop/pour your cake batter into the waiting ungreased tube pan. Gently smooth the top so it’s flat, and run the blade of a large offset spatula through the batter to eliminate any air pockets lurking under the surface. Smooth once again if needed, and pop the pan into the oven. The cake will bake at 350 for 40-45 minutes (mine was ready in 42). The most important part of this baking process: No peeking! I hope you have an oven with a glass front door so that you can watch it bake without opening the oven door. The drastic change in temperature will cause your pretty cake to fall, and who wants that?


When the cake is fully baked, it should spring back when you touch the surface, and it should be golden brown and cracked. It may settle a bit in the pan from its full height while baking, but don’t let that alarm you. As long as it doesn’t keep shrinking and settling, you’re fine. Remove the baked cake from the oven and invert the pan to let it cool. Some tube pans (like mine) are fitted with three evenly spaced feet on the top edge of the pan to allow the pan to rest on them while the cake is cooling. If yours doesn’t have these, prop up the center tube on top of a small glass or even the neck of a bottle. Let the cake sit upside down for a minimum of 1 1/2 hours, so that it’s fully cooled and in no danger of collapsing on itself. When the cake is fully cool, run a thin knife around the edge of the pan to loosen the cake, as well as around the center tube. Push the cake out of the pan with the tube portion still attached, and separate the cake from the bottom tube portion of the pan. Turn the cake over so that the browned side is facing down, and place it on a serving plate to await its frosting!
To make the Meyer lemon curd: Melt the butter in a medium-large pot over medium-low heat. Stir in the sugar, lemon juice, zest and salt. Whisk in the yolks until they’re fully mixed in.


Cook the mixture over medium-low, whisking constantly, until the lemon curd is thick; this should take about 7-8 minutes. Once the curd is all yummy and thickened, pour it into a bowl and cover the surface of the curd with plastic wrap to prevent a weird skin from forming. Set the bowl in the fridge and let it chill several hours or overnight!
To make the strawberry swiss buttercream: Put your egg whites and granulated sugar into a very clean bowl set over a double boiler. Make sure the water is simmering, and stir the whites and sugar periodically over the simmering water until the sugar dissolves and the whites are hot, for about 6 minutes. Pasteurized eggs in a carton are your best friend for this task because there’s basically zero risk of food-borne illness (if you’re worried about that kinda thing) versus using in-the-shell whites!


Once the sugar is dissolved (the mixture shouldn’t feel gritty between your fingers) and the whites are hot, pour it into a clean bowl of a stand mixer fitted with the whip attachment. Whip the whites and sugar on high (speed 10 on a Kitchen Aid) for about 15 minutes. The whites should be very stiff, and they should be around 91 degrees or so. Any warmer, and you risk melting the softened butter you’re about to add! Once the whites are cool and well-beaten, turn the mixer to medium speed (5 on a Kitchen Aid) and add the softened butter in small chunks until it’s all added. The butter will immediately deflate the whites, but that’s okay! Keep beating and when you’re almost done adding all the butter, the frosting should snap together and become a beautifully soft pile of sweet buttercream.


You’re gonna need to puree the strawberries, so go ahead and blend them up with a standard blender or, my favorite, and immersion blender! Get the puree totally smooth and free of strawberry chunks, and then add it to the buttercream, along with the vanilla extract. Beat on low until the puree is mostly incorporated, and then turn to high so it’s really well mixed. Now’s the time you can add some pink food coloring if you want to. Start slowly, cause you can always add more but you can’t take away once you add it! When the frosting is to the desired pink shade, put it into an airtight container until you’re ready to decorate the cake. This frosting is perfectly safe left at room temperature for a day or so until you’re going to frost the cake. If you refrigerate it, you’ll wind up with rock-solid frosting and you’ll have to let it come back to room temperature before using, and that’s no fun.
To assemble the cake: Grab your fully cooled angel food cake, and a decorative plate or platter to display the finished cake on. Cover the edges of the cake plate with pieces of parchment or wax paper to protect it from the frosting. Set the whole cake gently on the plate, dark side facing down. Using a serrated bread knife, cut off the top inch or so of the flat (non-browned) portion of the cake; set it aside on a plate. Using a small paring knife, cut a circle around the inside of the rest of the cake, about a half inch from the outside edge. Do the same thing around the center hole of the cake, leaving about a half inch thick ring of cake. Pull the cake out of the center between the two cut marks to form a trough in the center, only digging out about an inch-deep portion of cake.


Spoon the chilled Meyer lemon curd into the trough you made in the cake, and carefully pick up the flat portion of cake that was sliced off, and lay it back over the top of the curd. Press lightly to make sure it’s fully adhered to the rest of the cake!


Set the cake on its decorative plate on top of a rotating cake stand to make frosting easier. Using a long offset spatula, frost the cake with your strawberry buttercream, beginning with the sides to carefully seal the seam from the cut portion of the cake. Continue frosting the cake on the sides and the top, making the surface flat and smooth. Lastly, frost the inside of the center of the cake. If you want to make decorative swirls on the outside of the cake, use a flatware spoon and sort of make zig-zag motions lightly through the frosting, moving up and down as you spin the cake at the same time. You can also pipe a small bead border along the top of the cake using a small round pastry tip, if you wanna get fancy!


Now, for the flowers! Get your favorite springtime-y flowers and group a small bunch of them together Secure them with a rubber band near the top of the bunch, and cut the stems at a point where just the blossoms themselves will sit on top of the cake when the stems are placed into the center of the cake. For cleanliness and ease, wrap the bunched-together stems with plastic wrap or foil before setting them into the cake.
Boom! You’ve got a pretty, flowery cake that’s a total winter repellent! This cake is best eaten fresh, but if you’re not planning on serving it within 2-3 hours of assembling, stash it in the fridge cause the lemon curd is perishable. The cake should stay fresh for up to 4-5 days, especially if you place a piece of plastic wrap against any cut edges of the cake once you’ve sliced into it. If you have to serve the cake straight from the fridge, let it sit out at room temperature for an hour or so, so that the frosting can begin to soften.
The strawberry swiss buttercream is totally not like your standard American buttercream. For starters, it’s unbelievably smooth and even though it’s got lots of butter in it, there’s virtually zero greasy aftertaste! Lots of people that claim to not like frosting, end up loving this swiss buttercream. It’s got just the right amount of strawberry flavor, and when it’s paired with the soft angel food cake and bright, sunshine-y Meyer lemon curd, you’ll know that warmer weather has arrived. Those of you who’ve given up sweets for Lent, feel free to dig in! Enjoy it, and have a happy Easter!

It’s your turn! Tell me some of your favorite Easter desserts and traditions! Leave ’em in the comments :)


