

Pie is the unanimously expected Thanksgiving dessert. The meal just doesn’t feel complete without a slice of pie at the end! I’m sure most people would argue that pumpkin is the best pie to serve at Thanksgiving, while others might think of pecan or maybe apple. In my eyes, my favorite Thanksgiving pie is mince — meat-free, please!
I have fond memories of waking up the day after Thanksgiving to grab a leftover slice of cold mince pie for breakfast. My mom never made it from scratch, it was always Sara Lee out of a box, but it was delicious to me!
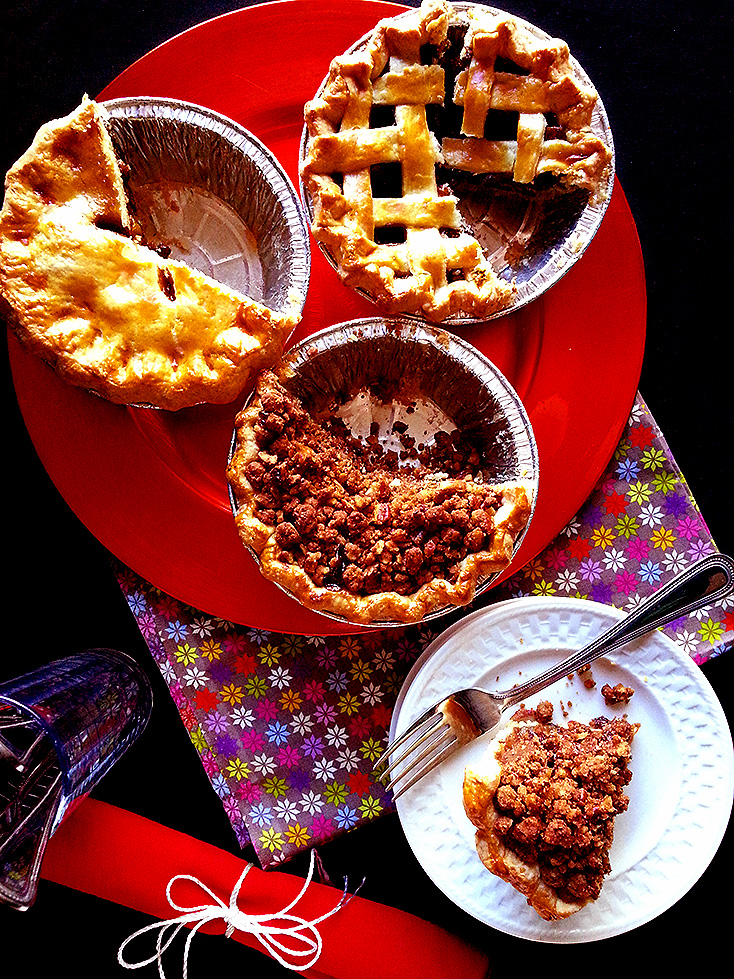
Do you err on the side of safety (and your sanity) and go the frozen/store-bought pie route during the holidays? Do you consider your pie crust efforts to be a surefire recipe for disaster? If so, I’m here to help! Pull on your aprons and turn on those ovens because it’s time to make some delicious, gorgeous, impressive pies of your very own! I’ll show you how to make an ultra buttery and flaky pie crust, a sweetly spiced homemade mince pie filling, and three different finishing options — a full top crust, a lattice crust, and a pecan streusel crumb topping! Let’s get started, huh?
Pie-making has one component that usually freaks people out and makes them think they can’t make pies, and that’s the pie crust. Pie crust is nothing to fear, I assure you! Simple ingredients like flour, water, sugar, and a little salt are all you need, and if you follow a few rules when making your crust, it’s sure to come out great every time.
Scroll to the bottom to find recipes for the pie dough, mince filling, and pecan streusel topping!
The butter – Butter in pie crust is, to me, the best fat to use. It is full of flavor and can help you create some deliciously flaky pie crusts! One very important aspect, though — the butter must be COLD. Not frozen, but you definitely don’t want anything close to room temperature or soft butter. Unsalted is also the way to go, so you can control just how salty your pie crust will be.
The mixing technique – In my experience, there’s no better way to mix up pie dough than just using your hands. Sure, stand mixers or even food processors make light work of all that butter-incorporating (and keeps your hands cleaner!), but it’s extremely easy to over-mix the dough, which is a guaranteed ticket to Sad Pie Town. Over-mixing of your pie dough encourages gluten formation (gluten is the protein present in wheat flour that is responsible for elasticity), which leads to a tough and un-tasty pie crust. The key is to incorporate your COLD butter into the flour, sugar, and salt until the whole mixture is somewhat dry and crumbly, slightly damp feeling, and will clump when squeezed in the hand, but does not look oily from overworking/melting the butter. Once you add the liquid, you want to mix the dough with a large wooden spoon (or again by hand, if you wish) just until the dough begins forming large clumps. There will still be a bit of the dry dough mix, but that’s okay, it’ll all come together in the end! From here, the dough will be wrapped in plastic wrap, flattened into a disc, and chilled until mostly firm before rolling out.
With properly chilled butter and a good mixing technique, you’re well on your way to a great pie crust!
Rolling and forming your crust – To roll out your properly chilled pie dough, you’ll need a large, flat area to roll the dough out, a rolling pin (or something that can be improvised, like a wine bottle), and some extra flour. After the dough is made and wrapped, it should be chilled for at least 30-45 minutes before rolling out. Chilled dough is much easier to handle, and it holds its shape much better than softer, room temperature dough! The dough should be rolled to about 1/4 inch or 1/8 inch, depending on how thick you’d like your crust.
Your pie dough should be rolled out to as close to a circle as possible. You can keep the dough in a circular shape by rolling in an X shape, back and forth, rotating the dough on your floured surface by about 90 degrees if it starts to get misshapen. Start from the bottom and roll up toward the top, pulling the rolling pin back toward you before rolling in the other direction. To form a proper crimped edge, the dough should be at least 1 inch wider than the size of your pie pan. Place your pan upside down on top of your dough to measure to the correct size.
Once you have your round dough rolled out, it can be placed into your waiting pan. Carefully lift up the dough from the rolling surface with both hands (feel free to fold it over in half gently if it’s too big to lift up whole) and center it over your pan. Drop it down in the pan and pick up the edge a little bit at a time so that the dough settles into the bottom of your pan. Using the side of your thumb, lightly press the dough into the bottom corner of the pan, turning the pie pan a bit simultaneously so that you have pressed down on the entire thing. Press the side of the dough into the pan and let the edges overhang the side of the pie pan. This procedure is the same no matter which top crust option you’re going with!


For a full top crust pie, roll the second ball of dough the same way you rolled the first. Fill your pie shell with your filling, and place the second round of pie dough centered on top of the filling, pressing lightly to eliminate any large air pockets between the filling and top crust. With a sharp paring knife, trim the top crust even with the overhang of the bottom crust and gently press the edges together all the way around. Roll the dough edges down and tuck them under, pressing them into the edge of the pie pan, working the whole way around. You should have a nice, somewhat thick rolled edge of dough all the way around the pan.


To crimp the crust edge, make a pinching motion with your index finger and thumb coming from the outside edge of the dough, and simultaneously use the outside edge of your opposite index finger to press the dough toward your pinching fingers. Work around the whole edge until the whole edge is crimped into sharp points. Chill the whole pie for a few minutes to let the crust firm up again. Brush the edge of the crust and the full top crust with egg wash (1 egg yolk to one tablespoon of milk), cut three slits in the crust top to vent, and bake!


For a lattice top crust, place the bottom pie dough round in the pie pan as usual, but leave the overhang of dough hanging over the side of the pan. Place the filling into the bottom crust and roll out the second ball of dough to a rectangle that is slightly bigger than the size of your pie pan. Cut the rectangle in half carefully, then cut each half in half again, and once again into strips. Lay half of the dough strips over the filling, letting the excess strip edges hang over the edges of the bottom crust. Pull back every other strip of dough and place another strip of dough across the two strips still lying over the filling. Fold back the two strips of dough to cover the perpendicular strip. Continue in this fashion, alternating lifting up every other strip as you place another dough strip over the dough strips still lying down. Once all the pieces are woven into each other, cut the hanging edges of pie crust strips so that they are even with the edge of the bottom crust. Pinch the edge of the crust lightly to adhere it with the edges of the lattice strips, and roll and tuck the crust edge in the same way as when doing a full top crust. Crimp as usual. Carefully brush/dab the lattice strips with egg wash; Bake!


For a streusel crumb-topped pie, roll out the bottom crust same as before. Roll the overhang of dough and tuck it under the edge of the pie plate as before. Fill the pie dough with your filling. Crimp the edges as before, and scatter on your streusel, completely covering the filling but just going to the edge where the filling and crimped dough edge meet. Brush the edges of the crust with egg wash; Bake!


The recipes
all-butter pie crust
makes enough for one 9 inch double crust pie or lattice top pie,
or two 9 inch streusel-topped pies
2 c (256 g) all purpose flour
1 c (8 oz / 2 sticks) unsalted butter, COLD and chopped small
1 tsp (7 g) salt
2 Tbs (30 g) granulated sugar
1/4 c (32 g) all purpose flour + 1/4 c (65 g) cold water
In a medium bowl, stir together the 2 cups flour, salt, and sugar. Add the cold butter chunks and with your hands, squeeze and mix the butter into the dry ingredients until crumbly, with butter pieces being no larger than pea-sized. In a smaller bowl, stir together the 1/4 cup flour and 1/4 cup water until smooth. Pour into the crust mixture, and with a large spoon or by hand, stir until slightly combined, so that the dough begins to form large chunks and there are still some dry areas remaining. Gather up by hand and shape into a disc. Wrap in plastic wrap and chill 30-45 minutes before rolling. Can be made several days in advance, just take out of the fridge to warm up slightly for about an hour before rolling.
pecan streusel topping
makes about 2 cups, enough for one 9 inch pie
1/2 c (70 g) all purpose flour
1/2 c (106 g) brown sugar
4 Tbs (2 oz) unsalted butter, melted
1 c (120 g) chopped pecans
1/4 tsp salt
1 tsp cinnamon
1/8 tsp ground cloves
1/8 tsp ground nutmeg
1 tsp vanilla extract
1 tsp baking powder
In a medium sized bowl, stir together flour, brown sugar, pecans, salt, cinnamon, cloves, nutmeg, vanilla and baking powder. Pour in melted butter and stir well until well mixed and crumbly. If not using right away, streusel can be stored in the fridge in an airtight container for one week.
mince pie filling
makes enough for one 9 inch pie
3 Golden Delicious apples, peeled
2/3 c (105 g) golden raisins
1/3 c (48 g) dried currants
1 orange, zested
1/3 c (67 g) brown sugar
2 Tbs (18 g) cornstarch
1/8 tsp salt
2 tsp (6 g) cinnamon
1/2 tsp (1 g) ground cloves
1/4 tsp ground nutmeg
2 Tbs (28 g) spiced rum
1 1/2 tsp (9 g) vanilla extract
2 Tbs (26 g) fresh orange juice
Slice the peeled apples in half and remove the seeds with a melon baller or sturdy teaspoon measure. Slice each half lengthwise into 3 thinner pieces. Slice into strips and again the opposite direction to form a medium dice. Place in a large bowl with the remaining ingredients. Stir well to combine. Fill pre-rolled pie shell, and top with desired top crust or streusel. Bake in preheated 350 degree oven for 60-75 minutes, until the crust is golden brown and the filling is bubbling. Check during last half of baking to make sure crust is not darkening too much. If the crust browns before the filling is done, drape a piece of foil loosely over the top of the pie and continue baking until the filling is fully cooked and bubbling. Let cool on a wire rack at room temperature until just slightly warm. Serve, or chill to serve later. Leftovers can be covered with plastic wrap and stored in the fridge for up to 4 days.


I hope that my tutorial has given you the confidence and know-how to turn out some lovely pies of your own, cause now it’s your turn to wow your Thanksgiving guests with some fancy pie action! Serve up a big slice, and savor all your hard work. Just don’t forget to save a piece in the fridge for breakfast the next day!


They look amazing! A very good read too :-)
Thank you! So glad you liked it :)