

It was a sad, sad day for junk food lovers everywhere when Hostess filed for bankruptcy in January. I remember the day after the news spread about the brand going under, I was at my local Target and the shelves that had previously held boxes upon boxes of Twinkies and cupcakes were totally bare. Even the end caps filled with packages of mini donuts were picked clean.
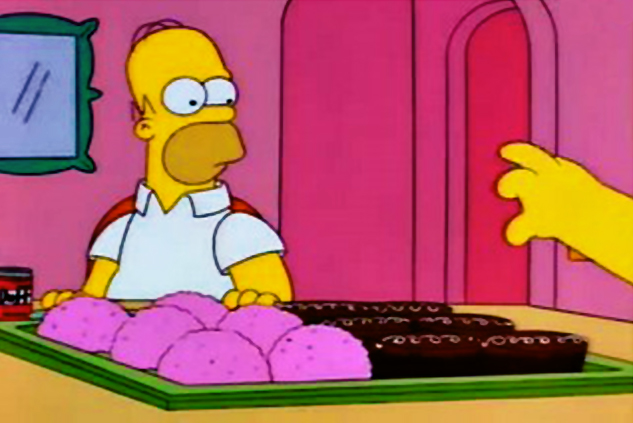
Bart’s a smart one! Much to Homer’s chagrin, he picked the sno-ball!
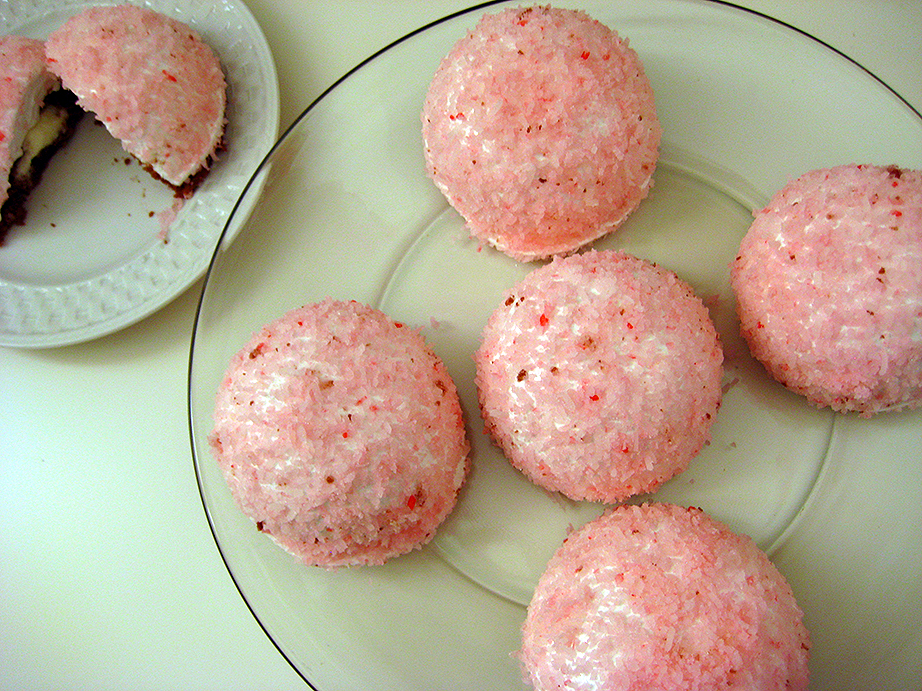
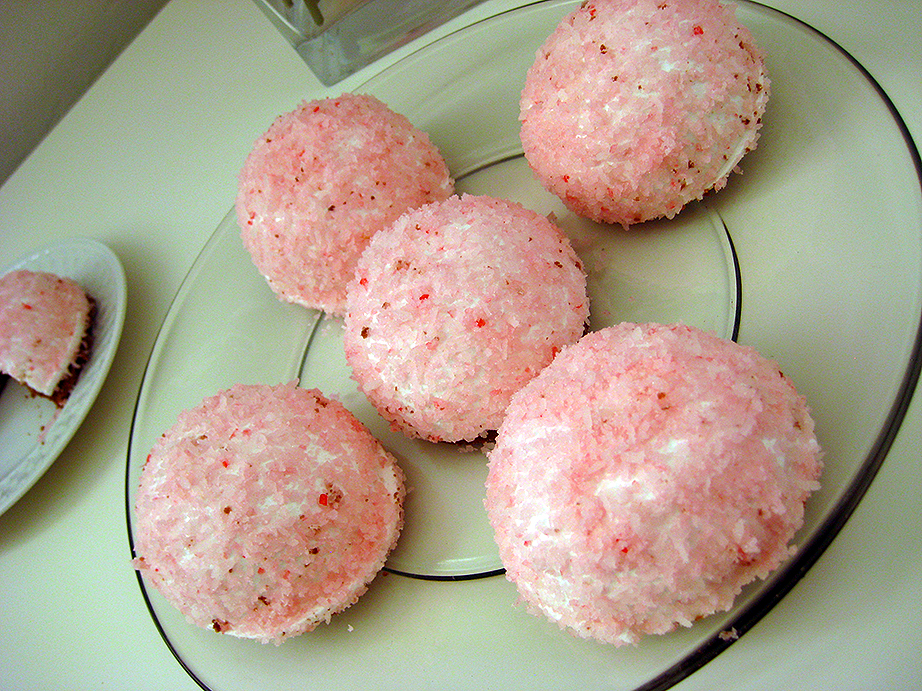
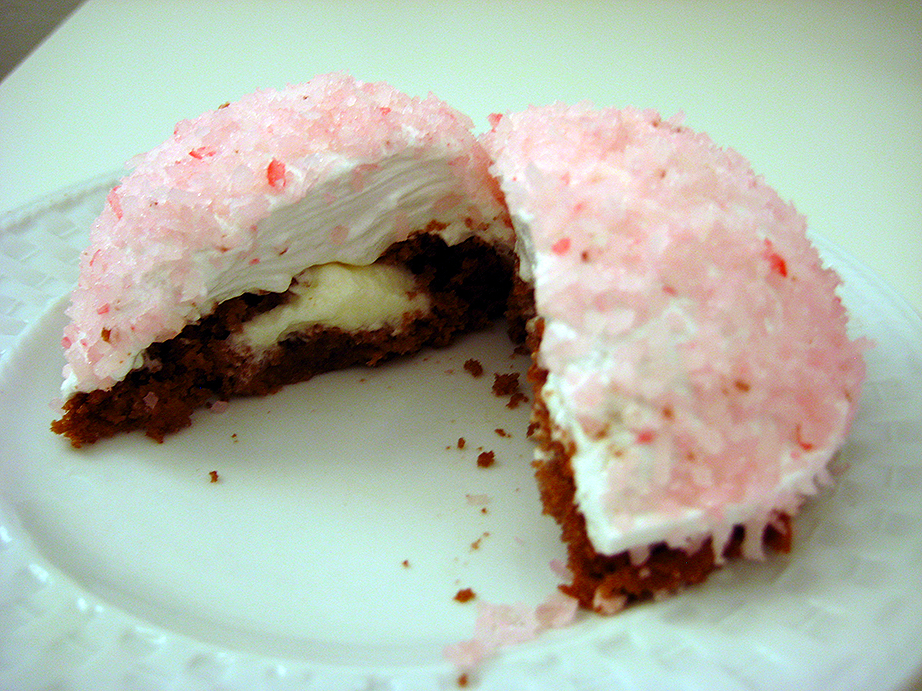
If you’re feeling sad about the decline of Hostess, fear not! I’ve gotchya covered, at least on one front, with my homemade version of Hostess Sno-Balls! Sno-balls were always my favorite Hostess treat. How could I resist chocolate cake, creamy filling and pink coconut-flecked marshmallow? Now, I could have gone the entirely homemade route and used a good dark chocolate cake recipe, but I was going for pure nostalgia and wanted to replicate as close as possible, one of my trashy junk food favorites. And thus — dun-dun-DUN! — chocolate cake mix from a box was the hero of the day… simple, reliable, eerily perfect cake mix. The filling was a simple combination of jarred Marshmallow Creme and real whipped cream. The marshmallow was the only thing that was truly homemade. While the end result was rather delicious, I look back on the project with a bit of trepidation. The cupcakes that were made from the boxed mix were very fragile and difficult to get out of the pans, as I did not use paper cupcake liners. Even with sprayed and floured pans, the cupcakes were a bitch to take out. So, you may decide to line the cupcake tin’s cups with small slings of parchment paper to facilitate easier removal, or just simply use paper cupcake liners and build actual cupcakes from the individual components, instead. So if you’re ready for a slightly time-consuming albeit fun way to while away an afternoon, let’s get busy on these Sno-Balls, eh?
diy sno-balls!
(should yield at least 18 sno-balls)
cupcakes
1 box chocolate cake mix (the darker, the better!), prepared
according to package directions
creme filling
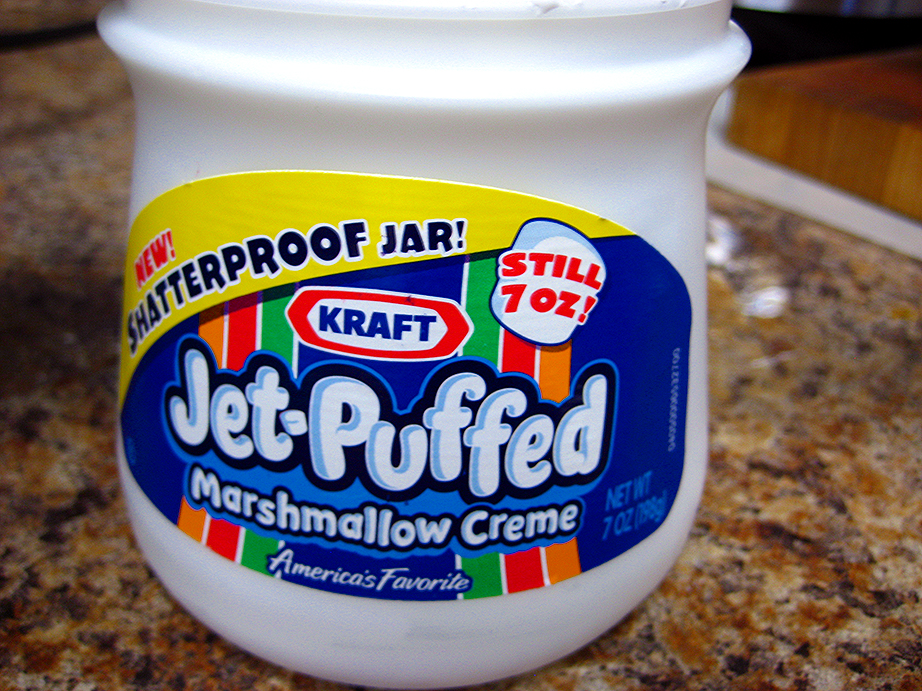
1 7-oz jar Marshmallow Creme
1 cup heavy cream
marshmallow + pink coconut
3/4 oz (22 g) powdered gelatin
1 c cold water, divided
12 oz (340 g) granulated sugar
1 c (350 g) corn syrup
1/4 tsp kosher salt
1 tsp vanilla
1 – 14 oz bag sweetened coconut flakes
2-3 drops liquid red food coloring
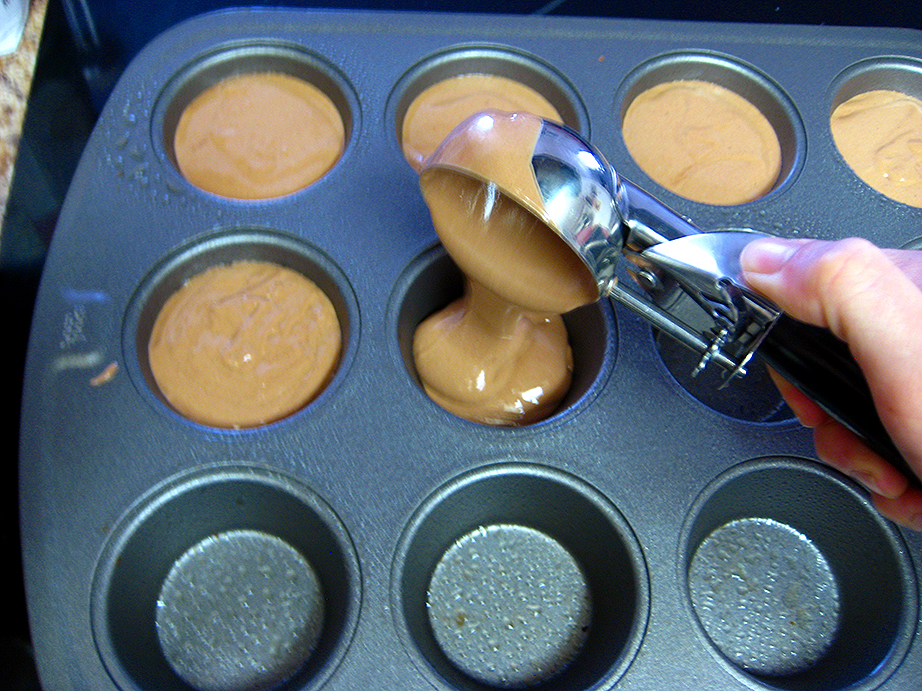
As I mentioned above, the chocolate cupcakes turn out better for these sno-balls if the mix is dark chocolate or devil’s food. I made the silly mistake of buying milk chocolate cake mix (damn you, Betty Crocker!), and the chocolate flavor was not as pronounced as I’d have liked. So, get a dark chocolate flavor and don’t repeat my mistake. Prepare the mix according to the package directions, and scoop the batter into a greased and floured (or spray the cups and line them with small strips/slings of parchment paper to help lift them out later) standard cupcake tin. Bake according to the package, and let cool before removing from the pan. Once cooled, the tops may need to be sliced off in order to create a flat-topped cupcake. The tops will become the bottoms of the sno-balls and it’s better if they have a flat surface to sit on. Level off the cooled cupcakes if desired, and line a sheet pan with parchment paper and give it a light coat of cooking spray. Put the cupcakes on the parchment paper and set aside.

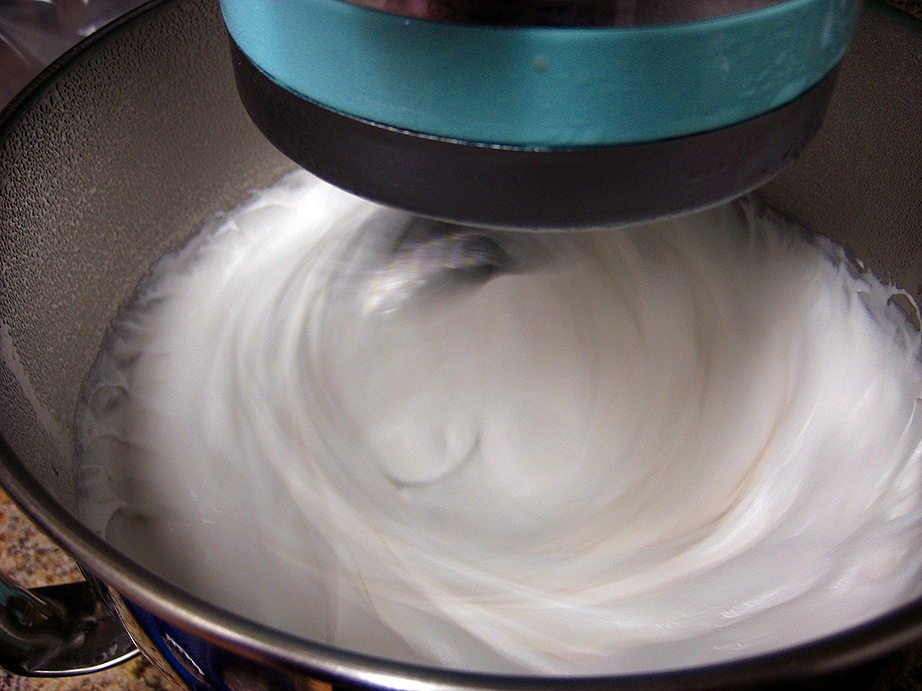
To make the creme filing, scoop the marshmallow creme into the bowl of a stand mixer, along with the 1 cup of heavy cream, and whip with the whisk attachment. You’d be wise to start out on speed 1 for about one minute, as the stuff tends to splash like mad. After one minute, turn the mixer up to speed 2 for one minute. Then, turn up to speed 3 for 1 minute, and then up to speed 5 for 1 minute. After this, the mixture should be getting a bit thicker. Crank the speed up to 6 and let it whip for 30 seconds, and then on the highest speed for another 30 seconds. Keep an eye on the mixture as it whips, and if you start noticing it getting grainy or curdled-looking, stop! Once the creme filling is finished, scoop it into a bowl and set it in the fridge until you’re ready to fill the cakes.

Now, it’s marshmallow time! In your cleaned stand mixer bowl, pour in half of the water, the gelatin and the vanilla. Stir with the clean whisk to incorporate it, and leave it sitting while the syrup cooks.
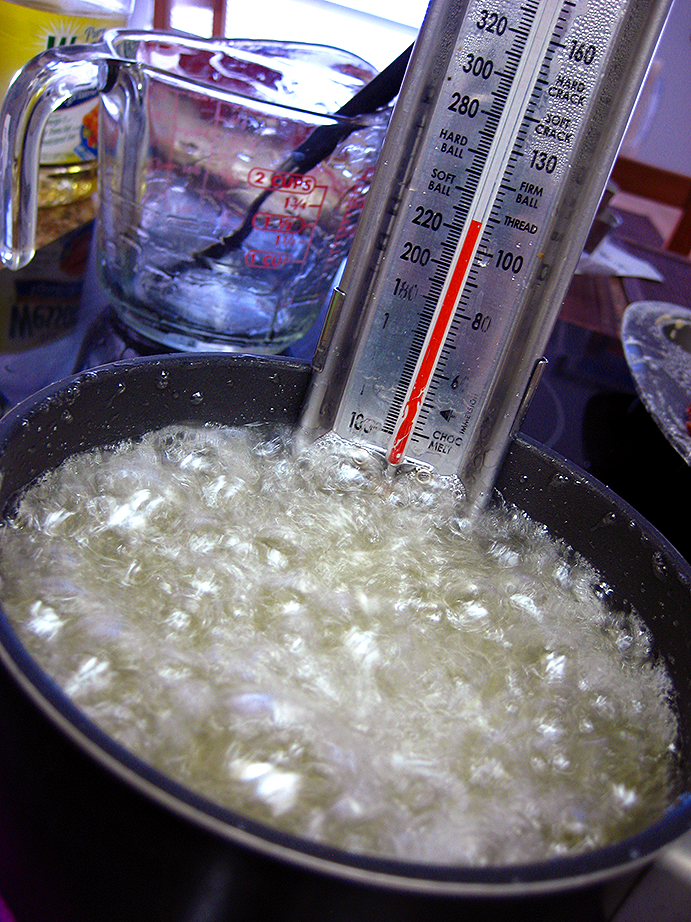

In a small sauce pot, add the remaining 1/2 cup of water, the sugar, corn syrup and salt. Clip a candy thermometer onto the pot and let the mixture cook on medium-low heat until the temperature reaches 240 degrees (soft ball stage). This took about 26 minutes for me, so figure on about as long for you, too, unless you’re at high elevation or sea level.
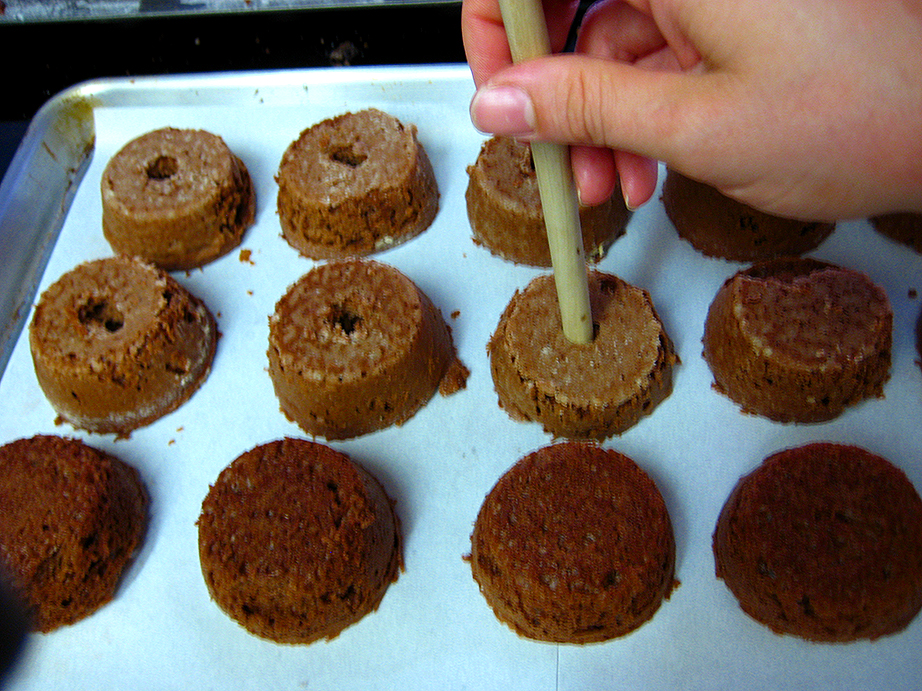
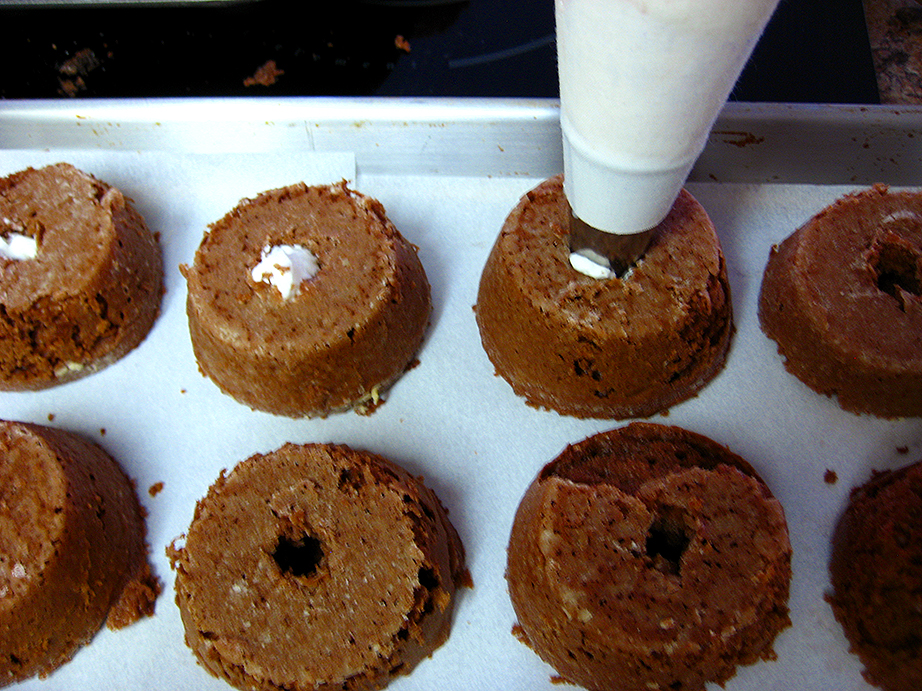
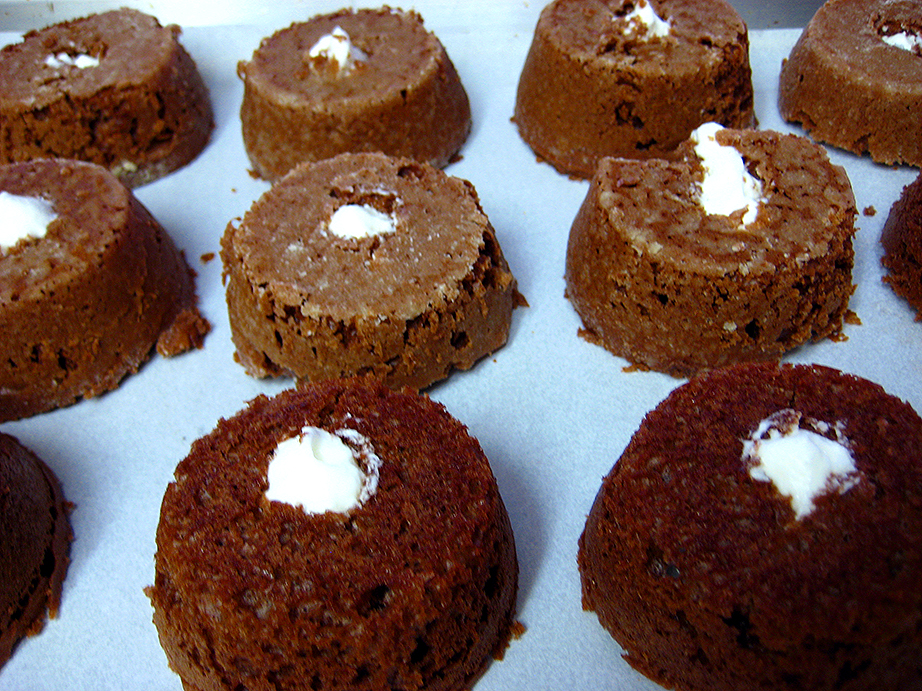
While the sugar syrup cooks, take the bowl of creme filling from the fridge and scoop it into a large piping bag (or a gallon-sized Ziploc bag with a corner snipped off) fitted with a smallish round or star tip. Using the handle of a wooden spoon, poke a hole in the bottoms of each cupcake (remember, the bottoms should be facing up) and move the handle around a bit to create a slightly larger cavity. Be careful, cause these cupcakes are pretty fragile. Pipe a small amount of creme filling into each cupcake, stopping when the filling starts to come out the top of the hole. You may have a bit of filling left, but just sandwich it between some of the sliced off cupcake tops and you’ll have instant whoopie pies that’re pretty tasty, and a nice snack while you’re finishing the marshmallow. Hey, I never said this venture was in any way healthy!

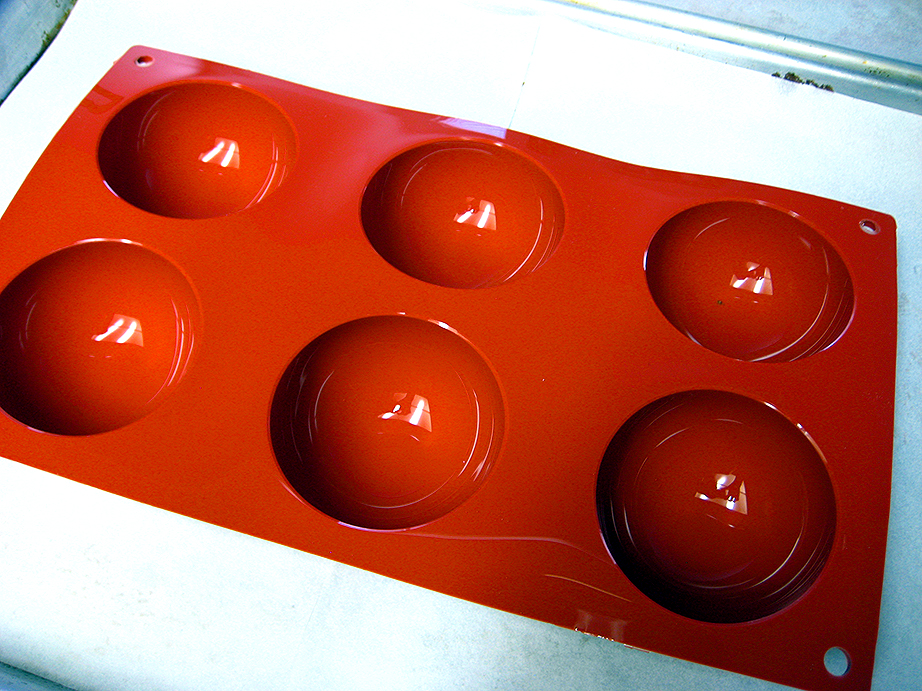
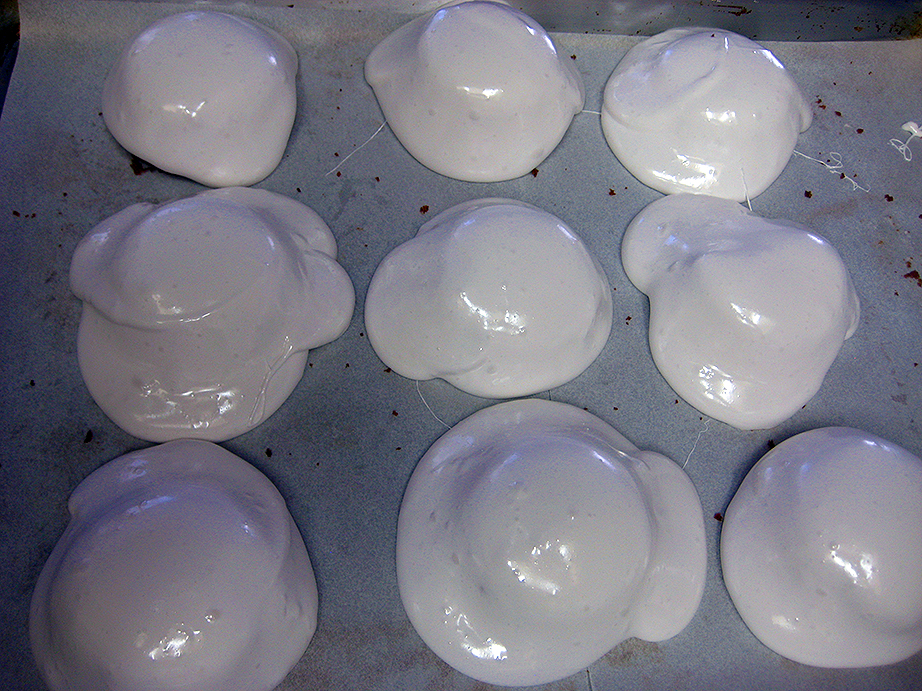
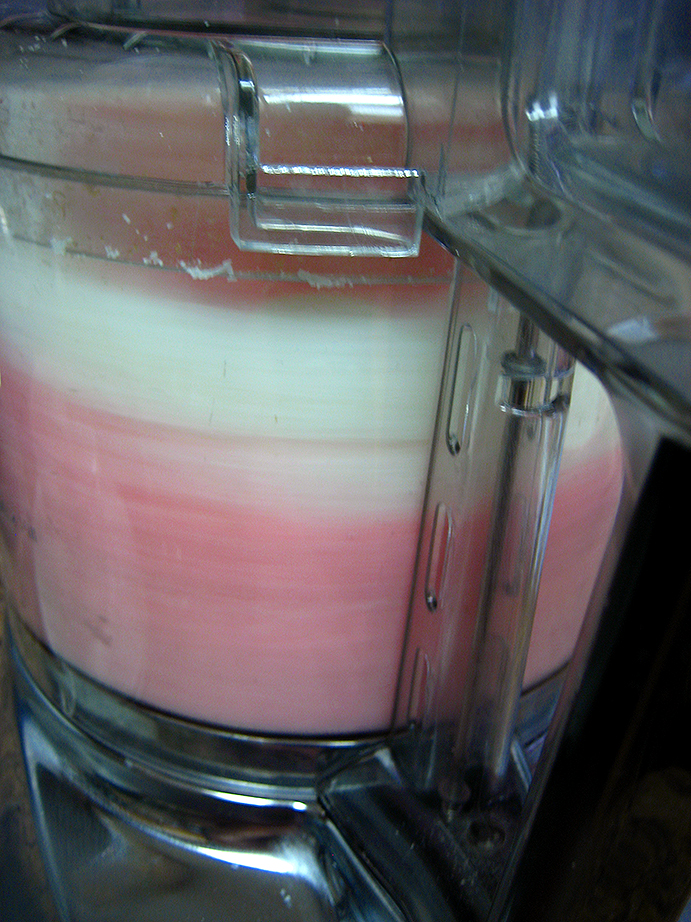
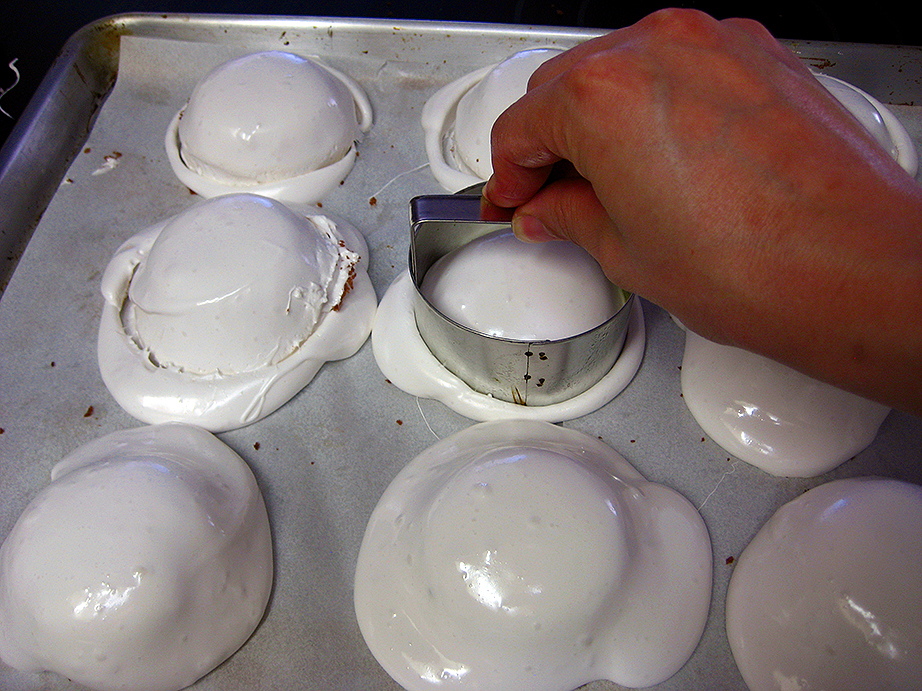
Once the sugar syrup has reached 240, take the pot off the heat and bring it over to the stand mixer. With the whisk attachment on the mixer, turn it on low speed and slowly stream the hot sugar syrup into the gelatin. Once all the syrup is in the bowl, turn the speed to high and beat for 4 minutes. The marshmallow will still be warm and slightly runny, but it shouldn’t be really thin or overly thick either. Carefully scoop the marshmallow into another piping bag (or another gallon Ziploc bag) with a round tip, and pipe a generous dollop right into the center of each filled cupcake, holding the bag in one place without pulling upward. Let the marshmallow settle over the top and sides of the cake. If there’s bare spots on the sides, just pipe some more over the bare edges and it will fill itself in. The marshmallow will probably start pooling on the parchment paper around each cake, but you can trim that off in a bit, using a round cutter approximately the size of each cake, or using a paring knife. [In addition to piping the marshmallow on top of the cupcakes, I also used a silicon hemisphere mold. I filled the lightly greased cavities of the mold about two-thirds full with marshmallow, and pressed the filled cupcakes into the marshmallow]


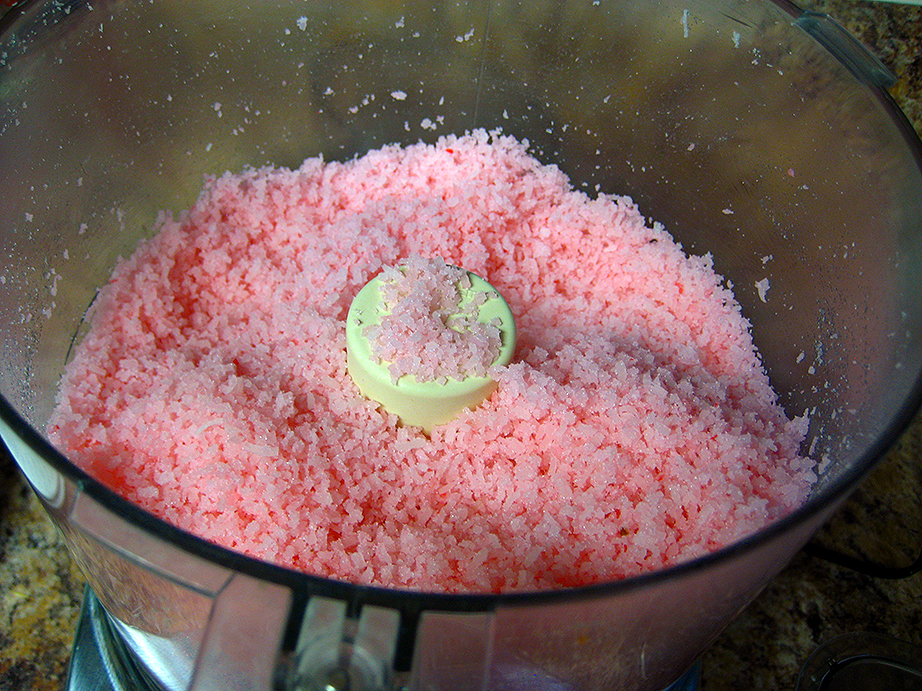
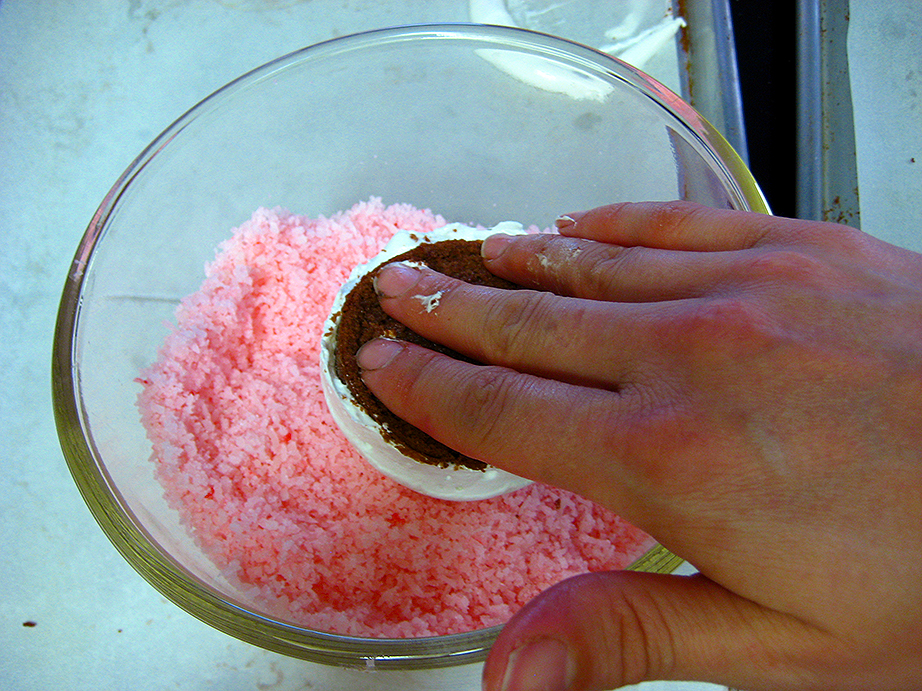
While the marshmallow sets up slightly, dump the coconut flakes into the bowl of a food processor with 2-3 drops of red food coloring. I used 2 drops, but I felt that the color could be brighter, so 3 drops may be perfect. Feel free to leave the coloring out if you want white sno-balls, or tint it with any color you like. Process the coconut until the color is fully incorporated and the coconut is in small pieces. Dump the coconut into a bowl and set aside.
Start trimming up the marshmallow from each cake, using a small pie spatula or butter knife to loosen the cakes from the parchment paper. Hold the marshmallow-covered cake in one hand and drop it marshmallow-side down into the bowl of coconut. This is a messy, sticky job, I’m warning you in advance! Pack the coconut onto the marshmallow, letting any excess fall off if it won’t adhere completely. Set the finished sno-balls on the parchment paper while you finish the rest.

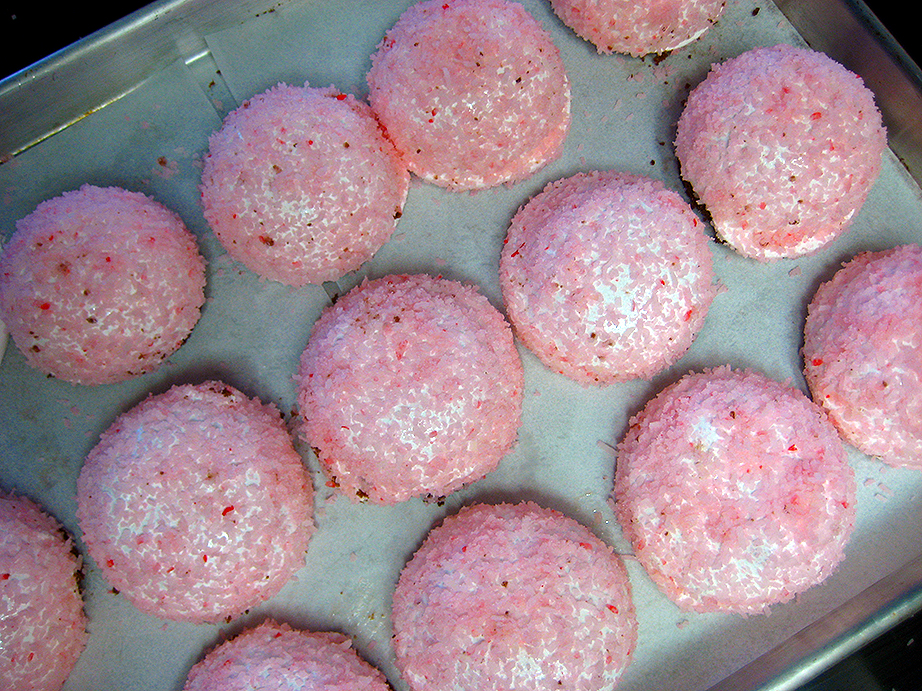
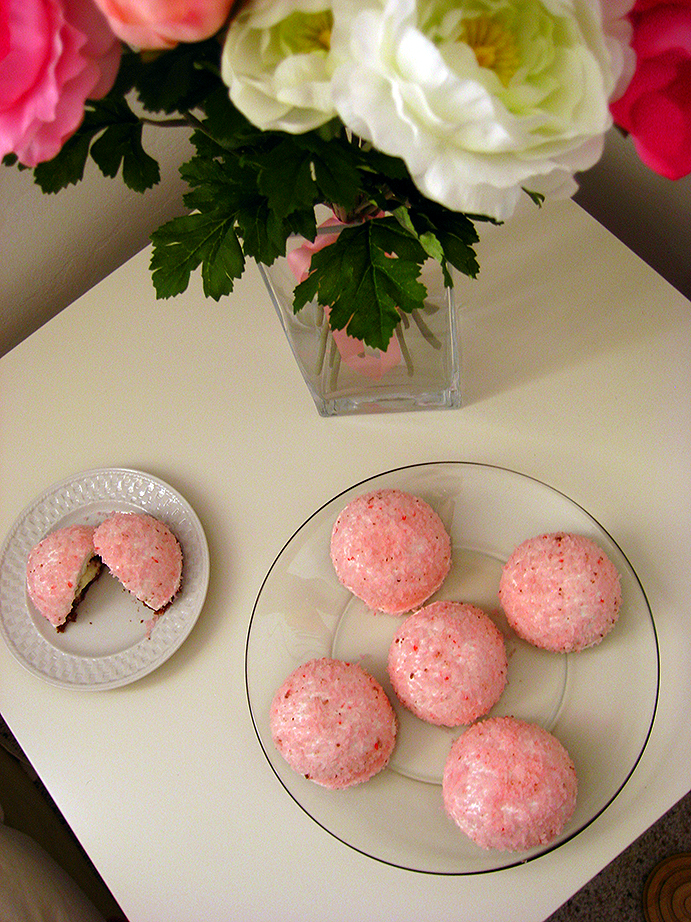
These are best eaten the same day they’re made, but they can also be kept for a few days in an airtight container in the fridge. The marshmallow layer may be a little thicker than the Hostess variety, and maybe a little chewier after a day or so, but beggars can’t be choosers! I thought they were very tasty, and though they were a bit tedious, I’d totally make them again with a few tweaks to the method. Either way, enjoy these tributes to Hostess’ sugar-laden, marshmallow-covered chocolate cakes that have gone the way of so many companies before. Chin up! Now that you have this recipe at your disposal, you can enjoy sno-balls virtually any time you want!


WOW – these look delicious!
Thanks Sophie! They were a bit temperamental to make, but the taste is SO worth it!